


This I suppose only just counts as ‘A view from the line’ type post as in reality it is a guide to my method of painting brickwork that I have used on all the brick buildings seen on Fisherton Sarum. I tend to construct most of my buildings using embossed plastic, mainly Wills material packs, which have more pronounced embossing when compared to for example than the A4 embossed plasticard sheets from the likes of Slaters. The method I am outlining below is also therefore possibly more suited to such heavier bossed materials. Although this post is primarily about brick painting the principles can also be applied to stone work (with obviously a change in the colours used).
As with any modelling technique be it loco building, tree making, weathering etc. it is always best to start by looking at the real thing and brickwork is no exception. Brick and mortar colours vary by location, age and the prevailing environment. Bricks can be a variety of yellows, oranges, reds through to blue, greys and even black. Mortar can vary from almost white, cream, grey through to almost black the latter especially in old industrial areas that have been subject to heavy atmospheric weathering, mortar and brickwork tends to stay lighter in the countryside than in an industrial / urban environment.

The colours that we see in brick walls also vary depending on the distance that we view the wall from as colour unlike a physical item does not scale in the same way. When we look at a real wall close up we see all the variations of individual brick colours, however when viewed from a distance the colours tend merge into a smaller more uniform palette. In model form we actually need to view from a far greater representative distance to achieve the same effect therefore if each individual brick on a model is separately painted whilst this would correct in close you would have to stand back a proportionally greater distance than in real life for those colours to start merge together.
The step by step guide I outline below helps to deceive the eye to overcome the effect of colour not scaling.
Note: the illustrations below were produced quickly on some spare building sheets rather than representative of greater time taken on a building itself. Click to enlarge
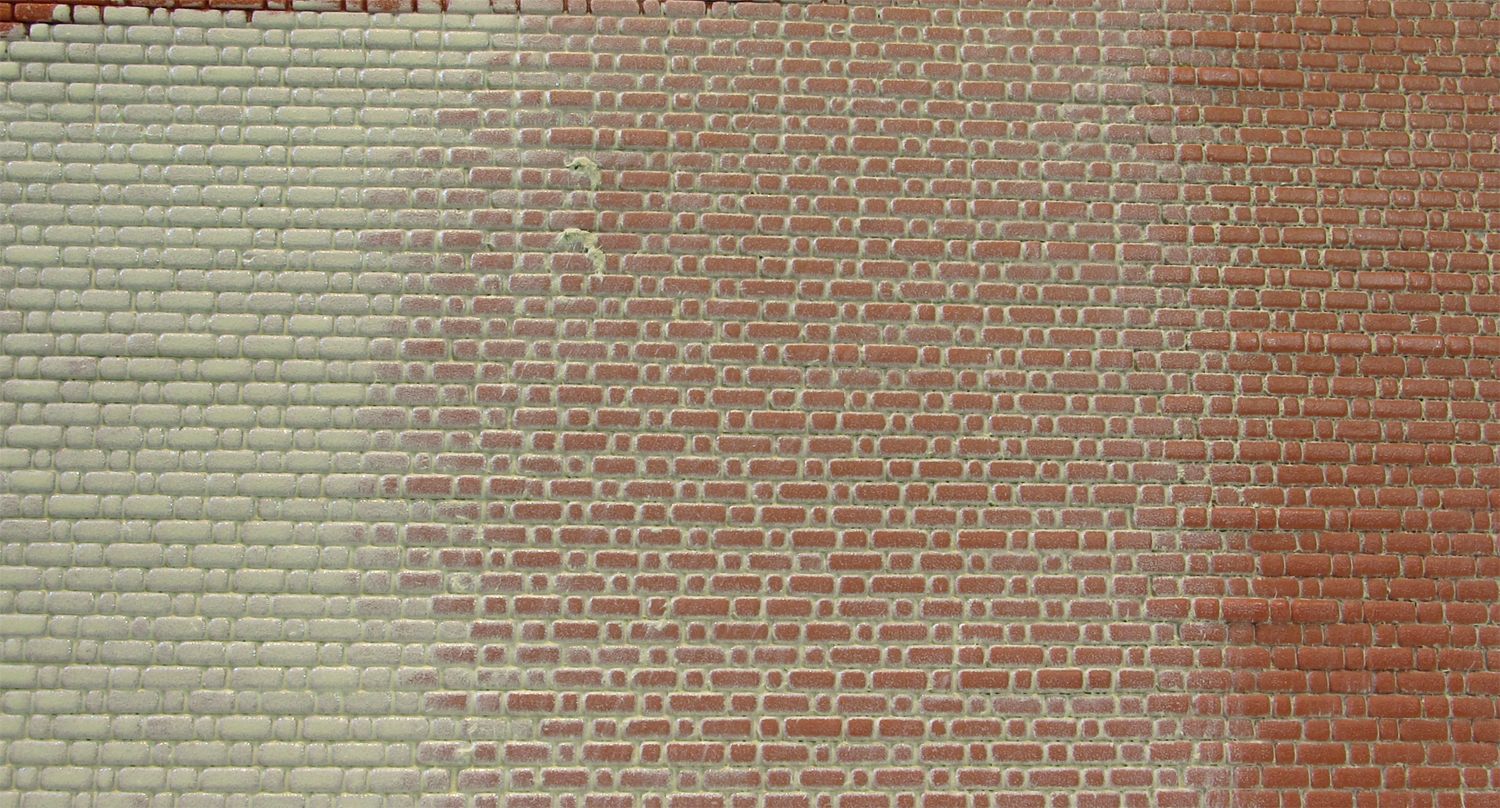
Firstly, for light coloured mortar, I cover the wall in my chosen mortar colour, in this case usually Humbrol 121, and whilst still, wet wipe the paint off the brick faces.
If I was wanting a dark mortar course colour I would do this step last after the dry brushing step has fully dried, again rubbing off the excess mortar colour off the brick faces.
This also has the effect of darkening / weathering the overall brick colour.

Secondly, I pick out individual bricks in a variety of colours using Precision Paints light brick red, dark brick red, blue, orange and even black and mixes of them too.
These colours should reflect the colours that are found on the prototype wall that you are wishing to emulate.
Different areas / ages of wall will have a different variety and range of individual brick colours.

Lastly I dry brush a mix of the Precision Paints Light and dark brick red and Humbrol brick red at 45 degrees to the mortar course over the entire wall over the top of the previously individually painted bricks. The 45 degree angle is key as this ensures the paint is applied to the brick top surfaces and does not fill the mortar courses. You can slightly vary the mix of this to colour as you go.
After this stage is dry then weathering cane be applied such as water staining, smoke staining, algae etc.

The effect of the dry brushing over the top of the entire wall is that when you view from a distance the wall colour appears almost uniform as discussed above, however as you get closer the colour of the picked out bricks shows up and provides the variety you get close up to a real wall. If you just pick out individual bricks with differing colours over the whole wall without the top dry brush in my opinion the individual colours still stand out too much especially when viewed from a distance.
This method is a variation on that used by excellent modeller Iain Rice in his book “Modelling with Plastic Structure Kits” published by Wild Swan. Like many things with modelling, this is just one way of doing and the way I prefer to use, there are other ways and other approaches successfully used by many other modellers.